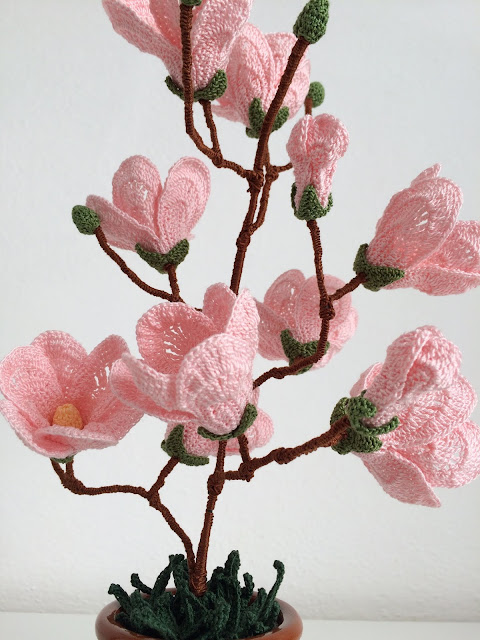
How to crochet a Magnolia
A very decorative shrub, usually used to beautify gardens and terraces. The magnolia, of which there are many varieties with many shades of colors, enchants us with its elegant bearing and the beauty of its flowers that have the characteristic of being born before the leaves.
To make the crochet magnolia you need to prepare: the flower, the bud, the pistil and the chalice.
Needed: cotton number 20 - 1.0 mm crochet - scissors - needle - galvanized iron wire 0.45 mm - wadding - plasticized iron wire - pliers.
Explanation of the flower
The flower is composed of two sections of petals.
Start 13 little chains and in these make 11 single crochet, 1 slip stitch in the first chain. Make 12 little chains and in these make 11 single crochet, 1 slip stitch in the first chain. Repeat same one more time.
1st round: 4 single crochet, 2 half double crochet, 2 double crochet in one point, 2 half double crochet, 2 single crochet. Make the other side of the chains the same. Repeat a total of 3 times.
2nd round: 7 single crochet, 2 half double crochet in a point for 2 times, 2 double crochet in one point, 2 triple crochet in one point, 3 double triple crochet in one point. Repeat same to the other side starting in reverse.
3rd round: 7 slip stitch, 4 single crochet, 2 half double crochet in one point for 2 times, 2 double crochet in one point for 2 times, 2 triple crochet in one point for 2 times, 4 double crochet for three points in one point. Repeat same to the other side starting in reverse. Close the work by keeping the cotton a little long.
Turn the petals on the inside, bring 2 petals at a time and at the bottom give 2-3 stitches to close the petals a little. Go down with the needle to the center and repeat the seam at the bottom of the petals for the other two. After the seam, turn the section of the petals towards the outer side of the work.
Make another identical section. Place them on top of each other to shape the flower and shape the petals with your hands.
Explanation of the bud
To create the bud, work a section of flower petals until the second turn and sew them halfway to the sides, giving them the semi-enclosed shape.
Explanation of the glass
The glass is the same for both the flower and the bud.
Start 5 little chains and close them in a circle.
1st round: 12 single crochet.
2nd round: 7 little chains and in these to do: 1 single crochet, 1 half double crochet, 2 double crochet, 2 triple crochet, jump 3 base points 1 slip stitch. Repeat equal a total of 3 times.
Explanation of the pistil
Start 4 little chains and in the first make 9 double crochet (total 10).
1st round: 15 double crochet (make an increase every 2 points).
2nd round: 2 double crochet closed together for the whole lap.
Cut about 8 cm of galvanized iron wire and in the middle wrap a little cotton wool or cotton wool. Twist the iron wire on itself for about 2 cm, thus blocking the cotton and creating the small stem of the flower. Close the second round.
3rd round: 3-4 slip stitch and close the work.
Insert the flower and the glass. Cover the small stem with cotton around the chains. The remaining wire will be used to connect the flowers to the other branches.
To create the secondary branch where to tie the flowers, cut a piece of wire of about 20 cm (someone also of different sizes). In the middle, wrap a little yellow cotton to form a small ball. Twist the wire on itself for the desired length, with the exception of about 2 cm on each side that will serve to fasten the branch to the main stem. Insert the bud with its glass and tie the flowers. Cover the branch with the cotton working around the chains.
Make all the branches you need for your composition.
A few small branches, instead of the flowered bud, have a green bud and I took up the explanation of the pistil to make it happen.
To create the main stem, cut a piece of plasticized iron wire of the length and thickness appropriate to the work being carried out. Using a pincer, bending a bit twice with a little cotton wool inside and inserting a green bud.
Fasten all the branches and cover the stem with the cotton working around the chains, except for about 3 cm that will be inserted into the vase.
Shape it all with your hands.
Magnolia is very beautiful even white or with all the other shades of pink, free space for your imagination.
As always I hope I have explained everything to the best and I wish you good creation.
Hello everyone, see you next time.


i did not understand how the stems are made- covered with thread ?, wrapped ? thanks for any information.
RispondiEliminaHi pgf, the stem is covered with cotton by working the chains around it. I made the video some time ago where you can see the whole process. You can find it at this link: https://bit.ly/2XXYjL4
Elimina