How to crochet a Hydrangea
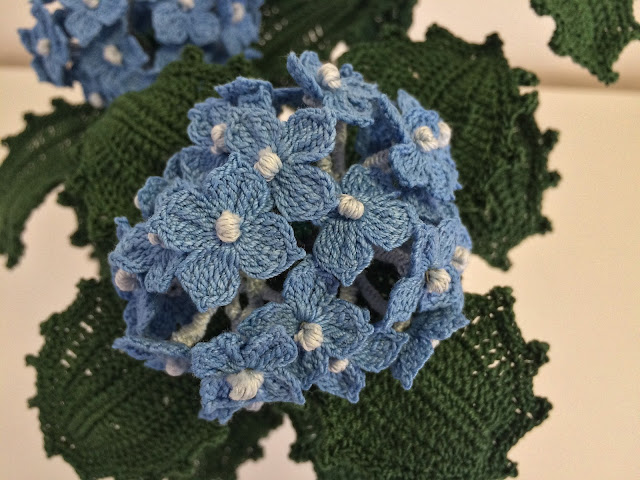
A beautiful and simple ornamental plant that with its wonderful colors decorates many gardens and terraces. The hydrangea is a plant that with its scenic flowering keeps us company until autumn. A curiosity: the color of its flowers is influenced by the type of land where it lives. I have always admired them in my mother's garden and now I decided to recreate it crochet.
To make the hydrangea it is necessary to prepare the small flowers that make up its characteristic corolla and the leaves that are of 2 different sizes.
Explanation of the flower.
Start 4 little chains and in the first step: 2 triple crochet, a double triple crochet (on top of which make a chain and a slip stitch), 2 triple crochet, 3 little chains, a slip stitch. Repeat same for a total of 4 petals. Start each petal with the 3 little chains that in the first are included in the 4 initial chains.
Make all the flowers you need for your hydrangea.
Each little flower has its small stem that unites them to form the classic corolla. To make the small stem, cut a piece of galvanized iron wire about 10 cm long. At 2 cm from a point, wrap the cotton several times (of a lighter shade than the flower) to form a small ball that will be the pistil of the floret. Block the cotton by twisting the iron wire on itself 3-4 times. Cut the cotton and the shorter piece of the remaining wire. The remaining wire will be covered with cotton by working around the chains for about 2 cm. This work must be done for every little flower.
Make small bunches of 3 small flowers each by twisting each piece of wire on itself 3-4 times and each time cut the extra wire (only 1 must remain). The bunches of 3 small flowers are again grouped into 3 bunches (you will then have 9 small flowers in a bunch) joining them always by twisting the wire on itself (this time leave 2 pieces of wire, it will be cut only 1).
Now prepare the main stem by cutting a piece of plasticized wire of the length and thickness appropriate to your creation. Curve for 2 times a tip that will be that of the top of the flower (help yourself with a forceps). On the top of the stem, tie the bunches of the 9 small flowers to create the classic corolla of the hydrangea. For mine I have connected 3 for a total of 27 flowers. Then model with your hands arranging the flowers to give it the right shape.
Now let's go to the explanation of the leaves I made of 2 different sizes and I used the number 10 cotton to give more fleshiness, for the rest I used the number 20.
Explanation of the big leaf.
Start 30 little chains. Cut a piece of galvanized iron wire 2 times around the chains plus 2 cm more per side. Insert it to the chains working around the single crochet, 29 on one side and 29 on the other. It will be the rib of the leaf and the remaining wire will be used to attach it to the stem.
1 lap: 3 single crochet, 3 half double crochet, 3 double crochet, 11 triple crochet, 3 double crochet, 3 half double crochet, 3 single crochet. Redo equal from the other side of the low points. With a slip stitch in the middle the wire reach the other side.
2 rounds: 3 single crochet, 3 half double crochet, 3 double crochet, 14 triple crochet, (make 3 increases), 3 double crochet, 3 half double crochet, 3 single crochet. Repeat same from the other side. Reach the other side with 1 or 2 slip stitch.
3 turn: 3 single crochet, in one point make: 1 single crochet, 3 little chains and in these make 1 single crochet and a half double crochet, a single crochet. Repeat the same for the entire turn of the leaf.
Tighten the work well and twist the iron wire about 2 cm on itself to form a small shank that will be covered with the chains. Close the work and stop the cotton.
Explanation of the average leaf.
The procedure is the same as the big leaf, only the initial chains change, which will be 27 and the triple crochet will be 8 (10 in the second round).
Of these medium leaves they will only have 2 stems as they are those that are fastened under the corolla of the flowers.
Once all the leaves have been made, fasten them to the stem which will then be covered with cotton, working the chains around them.
Then place each completed stem in the vase to create a small hydrangea plant. Mine of course is just an example that you can modify and customize according to your imagination.
As always, I hope I have been clear in the explanations and have given you one more idea. Hello everyone, see you next time.


Harikasiniz 😍😘
RispondiEliminaHello, thank you very much 😊
Elimina