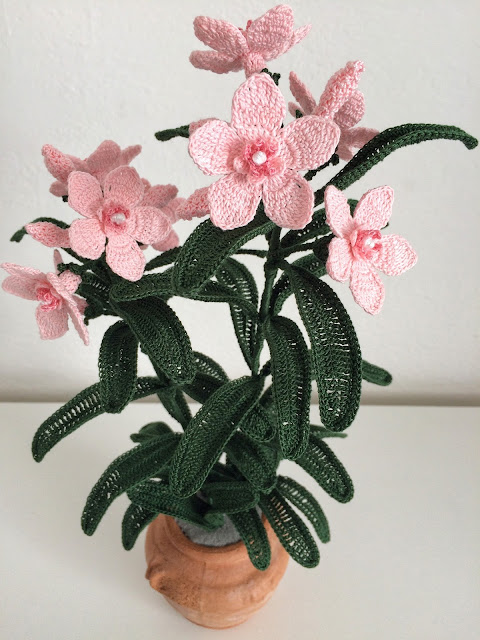
How to crochet an Oleander
We can say that with its spectacular and lasting flowering
it is a symbol of the Mediterranean summer. The oleander is a shrub that colors
our coastal areas and despite being poisonous it is very widespread as an
ornamental plant. It is not uncommon to find it along the streets to create
long, colorful avenues that immediately bring to mind seaside holidays.
To make the crochet oleander it is necessary to prepare: the
flower, a small central section, the pistil, the bud, the calyx and the leaves
with the relative stem.
Explanation of the flower.
Start 4 little chains and in the first make 7 double crochet
(total 8).
1 round: 9 double crochet.
2-3 rounds: 10 double crochet.
4 lap: 3 double crochet in one point for 2 times, turn the
job.
5 lap: 2 double crochet, 2 double crochet in a point for 2
times, 2 double crochet, turn the job.
6 lap: a half double crochet, 2 double crochet, a triple
crochet and a double triple crochet in one point, a double triple crochet and a
triple crochet in one point, 2 double crochet, a half double crochet.
Descend with slip stitch up to around 10 double crochet and
repeat the same for a total of 5 petals.
Explanation of the central section.
Start 4 little chains and in the first step: a triple
crochet, 3 little chains, a slip stitch. Then make: 3 little chains, a triple
crochet, 3 little chains, a slip stitch. Repeat same for 3 more times. In total
we will have 5 small tips.
Explanation of the pistil.
1 lap: 4 little chains and in these make 3 slip stitch. A slip
stitch inside the circle. Repeat equal a total of 5 times.
Explanation of the glass.
1 round: 4 little chains and in these: a single crochet, 2
half double crochet. Skip a base point. A slip stitch. Repeat equal a total of
5 times.
The glass is the same for both the flower and the bud.
Explanation of the bud.
Start 4 little chains and in the first make 7 double crochet
(total 8).
1-2 lap: 8 double crochet.
3 lap: 2 double crochet closed together for the whole lap.
4 lap: 2 double crochet closed together for the whole lap.
5 lap: 1-2 slip stitch. Close the job.
Now let's move the flower together.
Cut a piece of galvanized iron wire about 10-15 cm long, in
the center wrap several times of white cotton to form a small ball. Wrap the
wire around itself for about 3-4 cm, in this way the cotton is blocked and a
small shank is obtained, the wire that there is in a more will be used to
connect the flower to the main stem. In this small stem insert in order: the
pistil, the central section, the flower and the glass. The small stem will be
covered with cotton by working around the chains once above the stem once.
The buds will be sewn to this small stem of the flower (sew
the cup first), except the bud that will be inserted on the top of the main
stem before closing the fourth round and then the relative cup will also be inserted.
The main stem is prepared by cutting a piece of plasticized
iron wire of the thickness and length appropriate to the work you are making. A
tip, which will be that of the top, will be curved 2 times to create a little
knot (help yourself with a clamp). In the main stem all the flowers (someone
with the bud and someone without) and the relative leaves that I'm going to
explain will be connected.
Explanation of the leaf.
The leaves are coupled to three by wire.
Start 35 little chains.
1 lap: 3 single crochet, 3 half double crochet, 3 double
crochet, 16 triple crochet, 3 double crochet, 3 half double crochet, 3 single
crochet. Redo equal on the other side of the chains. Cut a piece of galvanized
iron wire that makes 3 times the turn of the leaf plus another 2 cm each side
and insert it to the leaf by working around a circle of single crochet. Tighten
the leaf well and twist the wire on itself 2-3 times, make 2-3 little chains
around this small stem and redo the same 2 other leaves. In the second and
third leaf to get to the wire and work the single crocjet go down with slip
stitch.
Make all the leaves that you need for your oleander and tie
them to the stem that will then be covered with cotton working around the
chains. Shape everything with your hands and arrange the stems completed inside
the vase giving it the shape of a small seedling.
I hope I have explained everything to the fullest and have
given you an idea in more than with your imagination and inspiration of the
moment you can always change.
The flower of the oleander is also beautiful white.
I wish good creation to everyone and to the next one. Hello.


Commenti
Posta un commento