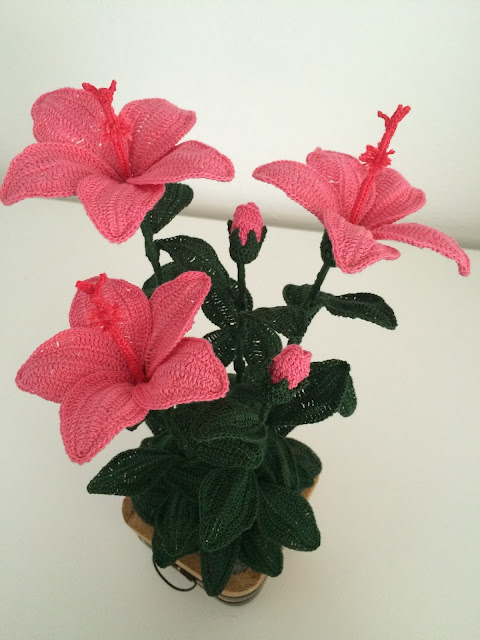
How to crochet a Hibiscus
It is one of the most fascinating tropical plants with flowers of particular beauty. Elegant and delicate at the same time with the peculiarity that lasts only one day.
Flower symbol of Hawaii that is donated to visitors as a sign of welcome. To recreate this crocheted flower I have been inspired by a plant I have admired for years in the garden of a home in my own country that has become a tree that when it is bloom is a wonderful sight. It was not easy but I think I got a very similar result to the original and I have the pleasure of sharing it with you. Now let's move on to the explanation.
Needed: cotton number 20 - 1.0mm crochet hook - scissors - needle - 0.45mm galvanized iron wire - plasticized iron wire - pliers.
Explanation of the petal.
Start 30 chains, cut the galvanized iron wire 2 times the length of the chains more than about 4 cm, place it on the chains and work as follows to fit it into the petal (will be the central rib of the petal).
1 turn: 3 single crochet, 3 half double crochet, 3 double crochet, 11 triple crochet, 3 double crochet, 3 half double crochet, 3 single crochet, equal to the other side of the chains.
2 lap: identical to the first lap plus 3 increases in triple crochet.
Twist about one inch of galvanized iron wire and close the work. Prepare a total of 5 petals per flower.
Start 30 chains, insert the galvanized iron wire 2 times the length of the chains plus 4 cm per side, work around the lower points on one side and the other on the chains (at the top, at the top 3 double crochet at each point of work 5 Chains and in these do 4 single crochet)
Now join the 2 sides of the single crochet by sniffing them to give it the right shape. This is done at a distance of about one centimeter from the top sewn around the cotton for about 5 turns (in short you have to be the shape of a purser).
Explanation of the chalice.
Start 4 chains and in the first 9 double crochet.
1 turn: 20 double crochet (one increment each point)
2 laps: 20 double crochet
3 laps: 6 chains and in these make: 2 single crochet, 2 half double crochet, 1 double crochet, skip 2 basic points, a slip stitches , a slip stitches at the next point, repeat the same for a total of 5 times.
After you have made all the petals and the cups you need to cut a piece of plated wire of the length you need to make the stem more about 4 cm you will insert into the jar. Helping with a twisted tweezers 2 times a bit to form a small ball that will make a pivot to hold the flower. (Put the 5 petals at the base first to give it the shape of the flower.) On the top of the stem, wrap the pistil. Now insert the stem with the pistil in the flower and then insert the glass without sewing it, it will remain firm.
Explanation of the bud.
Start 4 chains and in the first do 6 double crochet, run the work.
1 lap: 2 double crochet, a high double point, 3 triple crochet in a base point, a triple crochet, 2 double crochet, turn the job.
2 lap: 2 double crochet, 2 triple crochet, 3 triple crochet in one base point, 2 triple crochet, 2 double crochet, turn the job.
3 laps: 2 double crochet, 3 triple crochet, 3 triple crochet in one base point, 3 triple crochet, 2 double crochet.
Make a total of 3 petals that you will sew at the base giving it a spiral shape. Then insert the stem and the chalice as you did for the flower.
Explanation of the leaf.
The same petal process changes only that it will be 25 chains instead of 30 and the triple crochet instead of 11 will be 6, twisting about 1 cm of galvanized iron wire on itself to create a hanging microswitch that you will cover with cotton working around the chains.
However, leave it 2 inches by the side of galvanized wire wire to wrap it to the flower stem. Okay now that you've made all the leaves you need to join the stem through the iron wire and then work around the chains to cover it all. Now make up your creation in a jar or just make one to give to a special friend. Always remember that with your imagination you can create and give shape to so many wonderful things. What can I say, I hope, as always, that I have given a fairly comprehensible explanation and have given you a little help in achieving your small masterpiece. Have fun creating. Hello!
This is one of my first translations I realize. I hope they are clear. Let me know in the comments.
This is one of my first translations I realize. I hope they are clear. Let me know in the comments.


These instructions are incredibly confusing, most notably the "pistil" and "chalice" instructions. Do you by chance have a graph for these parts?
RispondiEliminaHello Kitty you are absolutely right. It was the first few years that I published my creations on the internet and for translations I tried to do my best with the help of Google. You have to excuse me but I'm not that experienced. If it can help I leave you the link of the video in Italian: https://m.youtube.com/watch?v=dzpIG1a1aIU
EliminaIt is incredibly confusing to follow.
RispondiEliminaIt's true I got many things wrong, you have to excuse me. As soon as I have some time I have to redo all the translations
Elimina