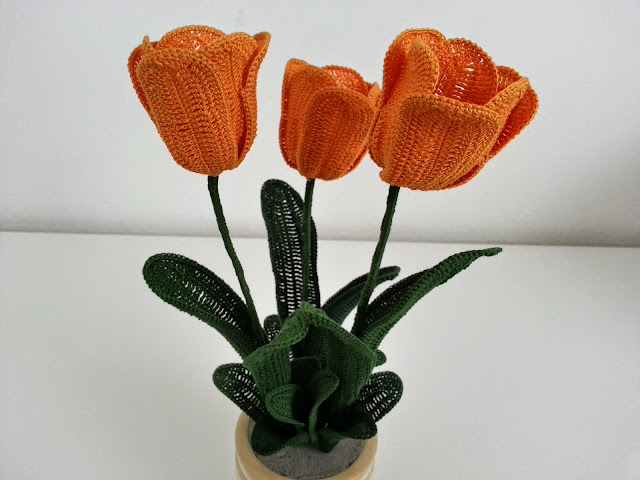
How to crochet a Tulip
It is one of the most popular flowers in the gardens, loved
by everyone for its simplicity and for the countless and colorful flowers that
in spring decorate all flowerbeds. I put a little bit to create the typical
shape of the tulip. In its simplicity it has created some difficulties but in
the end I think I have succeeded and I want to share with you the explanation
of this tulip to the crochet. The flower consists of 6 petals sewn at the base
and molded with your hands to give it the right shape and helping you with
small stitches on the sides of the petals to hold them still. Ok we start.
Required: cotton number 20-crochet 1.0mm- scissors-needle-galvanized iron wire 0.45mm-plasticized iron wire-pliers.
.Explanation of the petal
Required: cotton number 20-crochet 1.0mm- scissors-needle-galvanized iron wire 0.45mm-plasticized iron wire-pliers.
.Explanation of the petal
• Start 30 chains
• 1 lap: 3 single crochet, 3 half double crochet, 3 double
crochet, 17 triple crochet, 1 double crochet, 1 half double crochet, 1 single
crochet, resembling the opposite on the other side.
• 2 laps: 3 single crochet, 3 half double crochet, 3 double
crochet, 22 triple crochet (every 3 points increase), 2 double crochet at one
point below, 2 half double crochet jumps at one point below, 1 single crochet ,
to do the same thing on the other side.
• Now cut a piece of galvanized iron wire of the length of
the petal plus 2 cm in height, put it in the petal and work around the dots.
Pull the petal well to give it the right shape, twist the remaining wire of
iron to close the work, cut off that which is more than the piece that remains
folded into the inner side of the petal.
Explanation of the "central" gradient of the tulip
Forgive me but I do not know the exact term and anyway I
think it makes the idea. I could not create it with the petal without being
seen outside as well, so I thought to do it like this:
• With the black cotton start 5 chains, close in round and
do:
• 1 lap: 24 triple crochet.
• 2 turns: with yellow cotton, make 2 single crochet at each
point below and every 8 points make a 3-point chain.
Now cut a piece of plastic wire length you want to give to
the stem of your tulip. Then, in a tip, wrap several times of yellow cotton to
form a sort of pistil, helping you with a bent pliers the tip of the stem to
close and stop the cotton. Now enter the "gradient" and the flower.
Explanation of the leaves
• 1 turn: 3 single crochet, 3 half double crochet, 3 double
crochet, 31 triple crochet, 3 double crochet, 3 half double crochet, 3 single
crochet, equal to the other side.
2 laps: 3 single crochet, 3 half double crochet, 3 double
crochet, 41 triple crochet (increase one
point every 3 points) 3 double crochet, 3 half double crochet, 3 single crochet,
equal to the other side.
Cut a piece of galvanized wire wire of the leaf length more
about 2 cm per side and work around the single crochet. Make 2 leaves for each
flower.
Tend the leaf well to give it the right shape, close
the work and join the leaf to the stem through the remaining iron wire by
twisting it well. Put them apart one cm apart and position them one in front of
each other because in nature they are put this way. Now there is nothing else
to do about chains around the stem except the piece that will be inserted into
the vessel as I did. And if you want more natural composition, you can add some
smaller leaves around. You can also make a bunch of cut tulips, in this case
cover the whole chain with the chains and remember to fold the tip (helping you
with a pinch) so that the job did not slide away.
As always I hope you have explained everything to the best
and have helped you along with your passion and fantasy to create your
masterpiece. A warm greeting to everyone and to the next.


Mi spiace ma io non capisco nulla da questa spiegazione, ho provato 3 volte a farlo ma non mi riesce
RispondiEliminaCiao soso, spiace anche a me. È una traduzione che ho fatto qualche anno fa e il mio inglese non è perfetto. Se può esserti utile ti lascio il link della spiegazione scritta in italiano e il video sempre in italiano: shorturl.at/hmFHT
RispondiElimina